Developing R packages
This wiki presents a motivational example of a lot of properties of R packages and how to use them. Please see packages motivation for motivation about why you should utilize the package framework while doing research. The material in this page captures thoughts from lots of people and is a rewriting of a lecture Ben LeRoy presented while teaching 36-350 in the summer of 2019. Additionally, there are a lot of useful resources on the web to help you make an R package including:
- R Packages. ~Hadley Wickham
- Software for Data Analysis: Programming with R. ~John Chambers
- Writing R Extensions (the official documentation)
What’s nice about the R programming language how many easy-to-use resources there are to help you develop your own package. The following quote captures a notation that if you’re going to be working with R for long enough, package-driven development is going to happen - so why don’t you start now?
“… from user to programmer to contributor, in the gradual progress that R encourages.” ~ John Chambers (Software for Data Analysis: Programming with R)
Foundations (what tools will be used)
Currently, there are few very powerful packages to help you develop an R package as painlessly as possible.
devtoolsandusethispackages provide a set of functions to automate higher level package details and repeative package development demandsRoxygen2helps rapid and standardized documentation for your packagetestthatprovides clean and standardized tools for testing
Building an R package
Step 0: Setting up a Github repo and a Rstudio project directory
Version control (and discussed in Stat Computing) is a very useful tool to help streamline file management and provide piece of mind. Oftentimes, you will want to have a copy of the repository not just on your personal computer but online (to help with sharing, just in case your computer dies, it’s cool, etc.). As such these steps will walk you through how to set up a github repo for your new package and how to connect that repo to a new project in R studio.
- In
GitHub, do the following:- go to the top-level directory (i.e.,
github.com/<your user name>) - click on “+” at top right, and select “New repository”
- name the repository (e.g., “tartan”)
- provide a short description of the repository (don’t leave completely blank!)
- keep the repository public (as students you have access to free private repos https://education.github.com/pack, but for purposes of this example we will keep the repo public)
- click on “Initialize this repository with a README” and select the R option in “Add .gitignore”… there is no need to “Add a license”
- click on “Create Repository”
- go to the top-level directory (i.e.,
- …then in RStudio, do the following:
- click on
File > New Project... - click on “Version Control”, then on “Git”
- provide the full address for the “Repository URL” (including the
https, etc.; by default, this will provide the name of your local repository) - make sure “Create project as subdirectory of:” points to where you want to point it
- click on “Create Project” (in this example we will be calling our package
tartan)
- click on
Step 1: Creating a minimal source package
An R (source) package just files in a directory, formatted in a specific way.
To create the bare bones R package, just type in your Rstudio console:
usethis::create_package("tartan")# output of the above command
> usethis::create_package("tartan")
✔ Setting active project to './tartan'
✔ Creating 'R/'
✔ Creating 'man/'
✔ Writing 'DESCRIPTION'
✔ Writing 'NAMESPACE'
✔ Changing working directory to './tartan'- if in the
tartanproject, may need to dosetwd("../"), run the above line and then dosetwd("tartan").
This will create a tartan folder with the following items:
- Directory
R/(where all the function source code goes) - Directory
man/(where all theRoxygencreated documentation goes - auto generated) NAMESPACEfile (information about what functions you’re providing the user - auto generated)DESCRIPTIONfile (information about your package)tartan.Rprojfile (if using RStudio - just R project information - auto generated)
and anything else you included from intializing your git repo (.gitignore, LICENSE, etc)

Description file meta-data
The first thing you should do is update a little bit of the meta-data in the DESCRIPTION file, an example of which is seen below. You don’t need to add lots, but you’ll probably want to at least add your name and a title.

Step 2: Writing a function
All of your R code needs to go in .R files in the R/ directory. You can create these files yourself, but you can also automate this with
usethis::use_r("welcome") # opens up file (creates if need be)With the previous line of code creating an empty R/welcome.R file.
Inside this file, let’s image we add the following function
call_scotty_demo <- function(your_name) {
  if (nchar(your_name) > 30){
    warning("your name is beyond 30 characters, and has been truncated")
    your_name <- substr(your_name, 1, 30)
  }

  name_length <- nchar(your_name)

  # Hiiiii
  cat(paste("\n",
    paste0(c("", rep("-", name_length + 8), "\n"), collapse = ""),
    paste0(c("| Hi ", your_name, "! | \n"), collapse=""),
    paste0(c("|   ", rep("-", name_length + 4), "\n"), collapse = ""),
    paste0(c("| /\n")))
  )

  # from Scotty.
  cat(paste0(
      " |/  |\\_/|          \n",
      " |   |q p|   /}      \n",
      " |   ( 0 )\"\"\"\\   \n",
      "  \\  |\"-\"`    |    \n",
      "     || /=\\\\  |     \n",
      "     \"'\"  '\"\"\"'"))

}
To get access to this function we can locally load the package into memory (a weaker install than calling library()) by running:
devtools::load_all()Note that load_all() can be called over and over if you keep updating your function files and will re-load the newest verion of all your functions.
Additional notes
Unlike writing code in an .Rmd or a .R file, we deal with library dependencies slightly differently. If you know functions need tools from a certain library we put that library in the Imports: section of your DESCRIPTION file. Additional to use functions from outside libraries in our functions we have to write them like package_name::function_name. For example in our function call_scotty_demo if we wanted to use stringr’s str_sub function we’d have to have our code look like:
call_scotty_demo <- function(your_name) {
  if (nchar(your_name) > 30){
    warning("your name is beyond 30 characters, and has been truncated")
    your_name <- stringr::str_sub(your_name, 1, 30)
  }

  name_length <- nchar(your_name)

  # Hiiiii
  cat(paste("\n",
    paste0(c("", rep("-", name_length + 8), "\n"), collapse = ""),
    paste0(c("| Hi ", your_name, "! | \n"), collapse=""),
    paste0(c("|   ", rep("-", name_length + 4), "\n"), collapse = ""),
    paste0(c("| /\n")))
  )

  # from Scotty.
  cat(paste0(
      " |/  |\\_/|          \n",
      " |   |q p|   /}      \n",
      " |   ( 0 )\"\"\"\\   \n",
      "  \\  |\"-\"`    |    \n",
      "     || /=\\\\  |     \n",
      "     \"'\"  '\"\"\"'"))

}
and our DESCRIPTION file would need lines like
Imports:
    stringr
Step 3: Documenting your functions
With devtools and a package it’s actually really easy to create local documentation for your own functions so that ?function_name pops up documentation in the same way ?sum does in Rstudio.
The easiest way to document your code is using Roxygen2’s helper tools. To start, make sure you’ve downloaded the package:
install.packages("roxygen2")
library(roxygen2)
Then at the first line of a function you’ve written (when you’re in Rstudio) use the short-cut Command + Option + Shift + R (Mac) or Ctrl+ Alt + Shift + R (Windows), this will auto-generate a documentation structure to fill in.
For example, if we had the function from above used the shortcut, we would then have:
#' Title
#'
#' @param your_name
#'
#' @return
#' @export
#'
#' @examples
call_scotty_demo <- function(your_name) {
  ...
}
which we could fill in with:
#' Meet Scotty, the Scottie Dog
#'
#' @param your_name string of your name (max length 30 characters)
#'
#' @return NULL. Though scotty appears on your screen and says Hi to you.
#' @export
#'
#' @examples
#' call_scotty_demo("Andrew Carnegie")
call_scotty_demo <- function(your_name) {
  ...
}
The basic structure of the documentation is decently straightforward (you can remove @export if you don’t want the function to export, and you can remove @examples if you don’t have any examples), but detailed guidance, documentation here can be super helpful (with information on linking functions and other packages, adding math equations, code text, etc.)
Now to actually create a documentation file, we run
devtools::document()The first time we do this we’ll create man/ folder if one doesn’t always exist and also create / update a corresponding file named man/call_scotty_demo.Rd file that R uses to generate documentation. Additionally, the document() function also updates the NAMESPACE file so when you load your functions you get the desired documenation (need to have @export in the docstring).
The man/call_scotty_demo.Rd document file looks like the following. Notice how it says “do not edit by hand”.
{r eval=F} % Generated by roxygen2: do not edit by hand % Please edit documentation in R/welcome.R \name{call_scotty_demo} \alias{call_scotty_demo} \title{Meet Scotty, the Scottie Dog} \usage{ call_scotty_demo(your_name) } \arguments{ \item{your_name}{string of your name (max length 30 characters)} } \value{ \code{NULL}. Though scotty appears on your screen and says Hi to you. } \description{ Meet Scotty, the Scottie Dog } \examples{ call_scotty_demo("Andrew Carnegie") }
To actually view your documentation files we need to re-load the package and then use the standard ? to get the help file:
devtools::load_all()
?call_scotty_demo
Step 4: Testing
Testing is critical to making sure your functions do what you expect. The easiest way to get started with testing is the testthat package, which also integrates with devtools. To start testing using testthat in your new R package do the following:
{r eval = F} install.packages("testthat") usethis::use_testthat()
This will set up the tests/testthat directory where we can store tests.
What’s the philosophy behind testthat
testthat functionality can be see as tools to do a range of needs, from low level testing all the way up to overall testing of all functions in a package.
- On the low level,
testthatprovides functions to test your expectations. The most fundamental unit of testing is this low level.testthat’sexpect_...functions provide the building blocks for testing. They describe what result is expected for your various computations and we can use these to make sure our functions are giving the expected output. For example:library(testthat) expect_equal(1, 1) expect_equal(1, 2)
Returns:
## Error: 1 not equal to 2.
## 1/1 mismatches
## [1] 1 - 2 == -1
- Grouping expectations is the next level. We can group a set of expectations to examine more complex functionality with the wrapper
test_thatwhich takes in a string describing what you’re examining, and then a set ofexpect_...s that are wrapping in{}. For example:test_that(paste("calling scotty works well (returns null", "and provides warning nchar > 30)"), { expect_equal(call_scotty_demo("Oski Bear"), NULL) expect_warning(call_scotty_demo("Oski Bear, your a wonderful, but slightly creepy Berkeley Bear")) expect_equal(1, 2) }Returns:
##
##  -----------------
##  | Hi Oski Bear! |
##  |   -------------
##  | /
##  |/  |\_/|
##  |   |q p|   /}
##  |   ( 0 )"""\
##   \  |"-"`    |
##      || /=\\  |
##      "'"  '"""'
##  --------------------------------------
##  | Hi Oski Bear, your a wonderful, b! |
##  |   ----------------------------------
##  | /
##  |/  |\_/|
##  |   |q p|   /}
##  |   ( 0 )"""\
##   \  |"-"`    |
##      || /=\\  |
##      "'"  '"""'

## Error: Test failed: 'calling scotty works well (returns null and provides warning nchar > 30)'
## * 1 not equal to 2.
## 1/1 mismatches
## [1] 1 - 2 == -1
- A set of grouped tests in single file. When building a package your functions will likely like in different
.Rfiles in theR/folder. To mirror this structure we put of our tests associated with a single.Rfile into 1 test file. These files sit in thetests/testthat/folder and must start withtest.devtoolsandusethisprovide a way to create these test in an automated fashion. For example, if we wanted to create a filetests/testthat/test-welcome.R, we could callusethis::use_test("welcome")which provides the message:
✔ Setting active project to './tartan'
✔ Adding 'testthat' to Suggests field in DESCRIPTION
✔ Creating 'tests/testthat/'
✔ Writing 'tests/testthat.R'
✔ Writing 'tests/testthat/test-welcome.R'
● Modify 'tests/testthat/test-welcome.R'
In these larger files (relative to group functions) we include group expectations as well as context information for the overall file using the
context()function. And example can be see below:context("test welcome from scotty") test_that(paste("calling scotty works well (returns null", "and provides warning nchar > 30)"), { expect_equal(call_scotty_demo("Oski Bear"), NULL) expect_warning(call_scotty_demo("Oski Bear, your a wonderful, but slightly creepy Berkeley Bear")) expect_equal(1, 2) })Once you have a test file in your package all you need to do is run
devtools::test()
and R will run all your associated test, and will return output like seen in the following image:
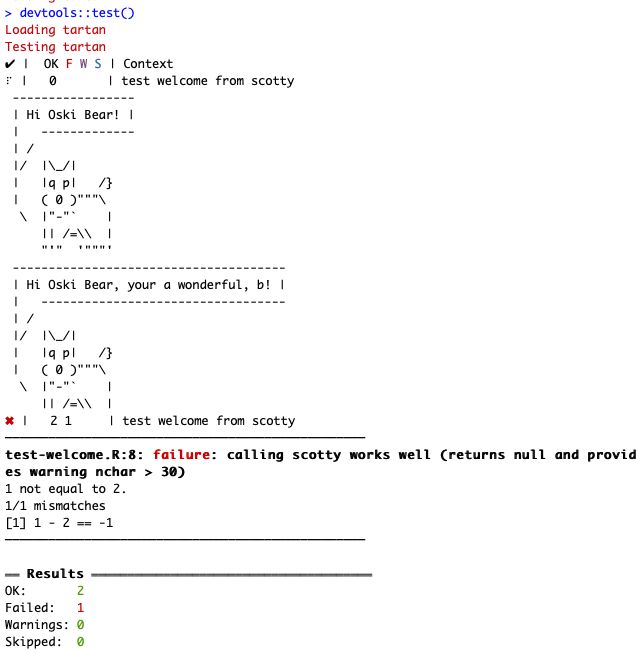
output of testthat

Step 5. Checking the full package
To understanding if your overall package is clean and able to be shared we can run
devtools::check()
This checks all your dependencies, syntax, and more that may have slipped through the cracks. Often times this is only necessary when you’re looking to share your package with others, but is a good step to include so you don’t have to change a lot of things right before sharing.
Step 6: Syncronizing with Github
As always, once you’ve completed a clean block of code you should push it to Github. When your code is on github other folks can download the package in a similar fashion to the standard install.packages(...),
For example, to install the R package we just made we could use:
{r eval = T, message=F, warning=F} devtools::install_github(repo = "benjaminleroy/tartan", force = F) # so making the sides does do it a ton of times library(tartan) #?call_scotty_demo call_scotty_demo("Big Bird")
Step 7: And beyond!
In the above example we still didn’t cover a lot of things, including:
- Including data in your package (that can be documented too)
r # suppose that I have a tarans dataset that I created - than I can save it this way usethis::use_data(tartans) # and document at usethis::use_r("data") - Vignettes (long form documentation, knitr)
- Compiled code (C, C++, Fortran…)
- Creating a CRAN ready package
- See
usethisto see all the package development steps thatusethisautomates.
