VSCode
VSCode is an open-source IDE maintained by Microsoft, and it is considered a “lightweight” code editor. In comparison with full integrated development environment (IDE) editors which occupy gigabytes of disk space, VS Code uses less than 200MB when installed. Despite the “lightweight” term, Visual Studio Code offers a massive number of features (via so-called “extensions”) which keep increasing and improving with every new update.
Resources:
Basic Usage
Some good extensions:
- Python (and Pylance)
- Jupyter
- R
- LaTeX Workshop
- Remote - SSH
- autoDocstring
Remote Development and Prototyping via SSH
In this section we will learn how to use VSCode to manage, develop, and test code that we have stored on a remote server (like Hydras, Azure, etc...).
This is particularly useful to avoid painful workflows that see us doing the following:
- develop locally on our laptop
- scp some scripts to the remote server and run them (assuming we have consistent environments)
- scp the results to the local laptop
- repeat from 1
Ideally, we want to be able to use the remote server only as the computational workhorse, while leveraging the GUI of our local operative system. Doing this in VSCode is extremely simple:
- In the left toolbar, click on the “Extensions” button and search for SSH. The correct one is hte one developed by Microsoft (blue icon). Click on the install button.

- Once the extension is installed, click on the small green button at the very bottom-left of the window (the one with a symbol similar to ><). A pop-up window at the top will open: click on “Connect to Host”
- At this point, we have two alternatives:
- add a new SSH host manually, which will prompt another small window where to enter the connection details (similar to what one does from the terminal)
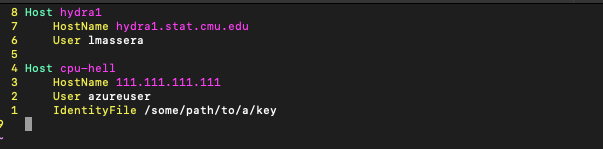
- or better, if we have a SSH
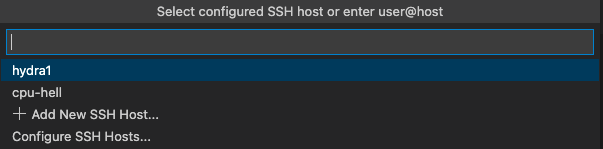
configfile in the.sshdirectory, VSCode will automatically list the possible remote servers that are specified in this file. If we specified a path to a key, then VSCode will connect automatically. If instead the remote server requires a password (as it is the case for Hydras), then we will be prompted with another window to enter it. As an example:
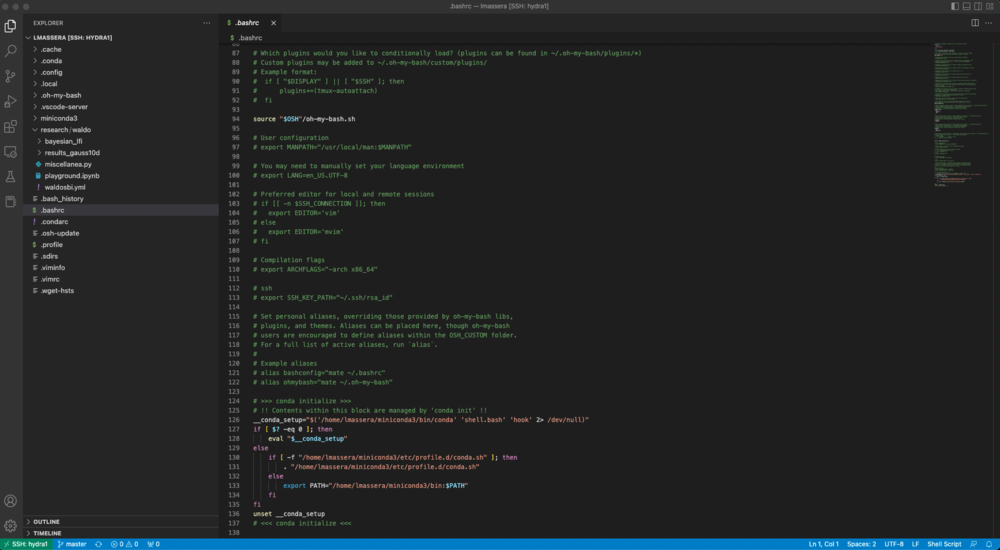
- Congratulations! You are now connected to a remote server through VSCode. By clicking on the “Explorer” button at the top in the left-side toolbar, you can navigate the file system of the server, develop and run code, etc. Everything you do and see is actually being hosted, run, and saved remotely.


Managing environments within VSCode
Since each project might (and should) have its own development environment that you setup, with dependencies and packages that make it unique for the tasks of this project, VSCode allows to easily choose which interpreter to use.
We simply have to click at the bottom right of the window, on the button that shows the current Python (or other language) version that we are using. This will open a prompt to choose the environment among those present on the machine we are developing on:

Support for Jupyter Notebooks (even remote!) within VSCode
In one of the previous section we learned how to setup VSCode for remote development. A great feature of the workflow that we have just enabled is that we can run Jupyter Notebooks (and produce plots, tables, etc...) that are hosted remotely while seeing the output on our local laptop within VSCode (this works also if we are running things locally). Doing so is very easy:
- Click on the “Extensions” button on the left toolbar and download the Jupyter extension

- Open a .ipynb file and choose the kernel (interpreter for the correct project environment) from the button that appears at the top right of the opened notebook

- Happy coding!
Support for RStudio (even remote!) within VSCode
Install the R extension, which provides support for the R programming language, including features such as extended syntax highlighting, R language service based on code analysis, interacting with R terminals, viewing data, plots, workspace variables, help pages, managing packages, and working with R Markdown documents.
Miscellanea
Amphetamine
If you need your laptop to stay awake while there's a process running --- you are running some cell in a notebook via remote SSH --- check out this article in the wiki.
Tunnelling
Disclaimer: this is particularly useful for PSC (Pittsburgh Supercomuting Center) users, as it allows to connect directly to a compute node on PSC and have things like Jupyter Notebooks run via VSCode without problems. This solution bypasses a problem incurred when connecting via SSH from VSCode, which caused to land on the login nodes. These have very little memory and basically do not support any computation.
Instructions for creating a VS code tunnel to PSC:
- First set up code CLI on PSC: https://dev.to/burkeholland/introducing-vs-code-remote-tunnels-connect-to-remote-machines-with-ease-3nlg
- Then run the following:
    curl -Lk 'https://code.visualstudio.com/sha/download?build=stable&os=cli-alpine-x64' --output vscode_cli.tar.gz
    tar -xf vscode_cli.tar.gz
This will create a "code" executable file which we need to add to the path. Open .bashrc (or .zshrc if you have a recent Mac) and edit the line that exports the path to be your current directory. If need be, you can get the path to your current directory using the command pwd
export PATH="<current directory>:$PATH"
- Restart the shell and check that "which code" finds the installation.
- Next, install the remote tunnels and remote ssh extensions on VS code.
- These are found in the extensions menu
- After installation there should be a blue "open remote window" (>< symbol) in the bottom left of the VS code window.
- Next, we set up the tunnel: https://dev.to/burkeholland/introducing-vs-code-remote-tunnels-connect-to-remote-machines-with-ease-3nlg
- Start interactive job
- Run
code tunneland follow the instructions. I recommend logging in via GitHub the first time and occasionally you will be asked to name the machine. By default it will name it based off of the node you are currently interacting with; however, the tunnel will connect to any node at PSC via the same setup so I recommend you name it something generic related to PSC. You will eventually see a message like “Open this link in your browser https://vscode.dev/tunnel/<machine name>” - On VS Code on your local machine, click the blue "open remote window" (>< symbol) in the bottom left and select Connect to Tunnel.
- Select GitHub and then the machine that matches <machine name> in the link shown on the remote location. This should reload your VS code window to be running on the remote server, but if you started an interactive job it is running on a compute node.
- To stop the connection, run "ctrl + c"
- If you need to deregister the tunnel run "code tunnel unregister" however, this should be unnecessary
For any future connection you run this same set of steps, as I haven't found a way to avoid re logging in via github every time.
